Law Enforcement Drills for Movement and Shooting
This month, we are talking about movement. There is plenty to be said about movement and shooting, but this article will cover only two different aspects: movement in confined places, and shooting while moving.
This article appeared in the July/August issue of OFFICER Magazine. Click Here to subscribe to OFFICER Magazine.
A few weeks ago, I was talking to someone who shoots at IDPA events. If you’re not familiar with the IDPA, it is the International Defensive Pistol Association. Participants shoot scenarios that are designed to simulate self-defense and real-life encounters. This organization is great training for CCW holders worldwide.
We were comparing notes. I was looking at drill and exercise designs, and talking about the square drill, which we will look at just a little bit. After looking at the design of the drill, he asked me at what point was the shooter supposed to engage the target. I explained to him that the shooter continues to engage the target. Our conversation outlined the differences between police training and standard CCW training. Competitive shooters usually run up to a shooting position, establish a good platform, and engage. When we train police officers to move and shoot, we generally do not teach stopping the movement in order to shoot, unless we are behind cover.
Many handgun competitions do have something in their rules that require the competitor to keep moving, but this is widely interpreted. Competitors generally move up to a shooting position behind cover, then stop to engage.
If you have experienced the emphasis in my writing over the years, you probably know that I like to view tactical situations in one manner: an officer is continually moving toward cover. If they are not behind cover, they should be moving to cover. Law enforcement officers generally don’t have the luxury of stopping, setting up a good shooting platform, and delivering accurate fire. Because of this, it is important for us to train for moving and shooting simultaneously. In order to do this, we have to look at continually establishing a solid shooting platform while on the move.
Please don’t misunderstand this. IDPA training is outstanding, and my IDPA friends can pretty much embarrass me on their IDPA range. I have a tremendous amount of respect for this, and similar shooting sports, and encourage people to engage there. I do not, however, teach marksmanship. As Lou Chiodo, of Gunfighters Ltd, and author of Dynamic Training Concepts, told me years ago, “I teach fighting with a gun.”
Movement in tight quarters
Early in my career, I thought every building search was going to be one of two things: Going through a residence serving a warrant, or responding to empty warehouses during commercial alarm calls. It only took a couple of weeks on duty to figure out that I needed to get good at maneuvering in tight quarters. During that time, I searched for an armed and dangerous suspect through a vineyard that bordered an orchard. Another time I served a warrant in a house where a person with a mental disorder had dozens of discarded mattresses in each room. Days later, I searched for an assault suspect through a fabricating plant where an entire warehouse of racks of steel rods and plates were arranged randomly. He worked there, and the weapon used on the victim was a (gulp) steel rod.
In tight quarters, it’s a bad idea to stick the gun out into an area that the officer lacks control. Maneuvering skills have to be combined with slicing the pie skills. Done correctly, the officer is constantly capturing real estate, moving from cover to cover.
Close quarters drill
For this drill, I used barrels that can be moved or adjusted to make it challenging. One time, while using this drill, all we had were pallets, and it worked out great. The barrels are arranged in a diamond so that one point of the diamond is closest to the line of targets. Arrange the barrels in the diamond close enough so the shooter has to move sideways to go from one point to another. This is not a “one size fits all” drill, so move the barrels in or out as needed. Set two targets up about 5 to 7 yards away, perpendicular to the furthest and nearest points of the diamond, and at least a yard wider than the width of the diamond.
I want to be clear that, like many other trainers, I did not invent this, or any other drill I use. I do modify them considerably, but smarter men than me have developed them.
The shooter begins by entering through the opening in the rear and snaking around to the front barrel. From the left side of the barrel, he shoots the target on the right side. From the right side, he shoots the left target.
It sounds simple, doesn’t it? The first thing one will notice is that they can no longer use a fully extended shooting posture. Extending the gun and hands past the area of the officer’s control is a recipe for disaster. This kind of maneuver requires some kind of compressed ready position.
Consider this: While the officer is negotiating the tight squeeze, can he engage a target that presents itself during the maneuver? That is, if a right-handed shooter had to slide the right shoulder forward (because it was so tight he had no choice) could he engage a target in front of him? In tight quarters, whatever shoulder is forward dictates the side from which the officer holds the gun.
One of the big differences between competitive shooting and police training is the use of cover. In competitive shooting, it’s generally considered OK if 50% of the body is behind cover when the shooter is engaging a target. In law enforcement training, the goal is to get as much of the body behind cover as possible.
That is the purpose for engaging opposite targets on the close quarters drill. In order to shoot the target far to the side of the diamond, officers must inch their way around the side of the barrel until they are able to engage, going no further. Regardless of if the shooter is left-handed or right-handed, the gun has to be fired with the hand outside of the barrel. That is, if the shooter is on the left-hand side of the barrel, engaging the right-hand side target, he must to be firing with the left hand.
The other part of this drill is the oblique angle of engagement. If the targets are parallel to the rest of the target line on the range, they are perpendicular to the bisection of the diamond shape. A shooter firing on such an oblique angle to the target must fire toward the near side of the target in order to hit it center mass.
Consider this: Lindsey is a right-handed shooter with right eye dominance. Shooting left-handed is difficult, but can be done. Using left side to sight the gun will cause a different point of aim then using the right side. We can’t say, “using the left eye,” because Lindsey uses both eyes to engage targets with a handgun. However, eye dominance has a tendency to take over. Lindsey has to position the gun to allow for right-eye dominance.
Compressed ready position
There has been a lot of conversation about the “Position Sul” position. Position Sul is a low ready position where the gun is carried close to the body. Engaging is simply a matter of pushing the gun out into the sighting plane. Law enforcement officers need to be familiar with this type of compressed position, as it increases gun retention, but doesn’t compromise readiness.
If you look at the photos accompanying this article, you’ll find that the compressed position has the firearm on the level with the sternum. This is like what is described above, except the gun is higher. There are a lot of different names they get thrown out when it comes to ready positions. For example, most instructors will call a “high compressed ready” position when the gun is near the sternum, muzzle pointed forward. The position to which I am referring here has the muzzle pointing down.
For this particular drill, the compressed ready position requires the officer to lean forward a bit, but still keep the center of gravity above a line drawn between the two feet. This is accomplished by keeping the knees bent while moving. If this is done correctly, the feet never cross of the bore line of the muzzle. That is, don’t point the gun at your feet.
The compressed ready position is appropriate for close quarters maneuver, but it is also a good strategy to have when a firearm is the tool, and the area is crowded. In the compressed ready position, an officer can move quickly, maintain good balance, and fire accurately.
The close quarters drill is a great way for a shooter to get to know his strengths and weaknesses, in a brutally honest way.
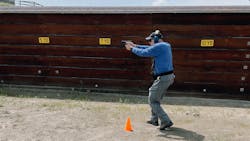
Square drill
The square drill has been in use for years to train shooters to move and shoot. It only requires a stationary target and four traffic cones. The cones are arranged in a box about 10 feet wide with the closest side parallel to the target about 5 yards away.
The shooter begins the drill from any corner, walking clockwise around the perimeter of the square. Shooters need to continually move, engaging the target with at least two rounds from each side. They may not stop at any time during the drill.
One can vary the course by requiring a magazine change, or a minimum number of shots.
For any shooter who has not done this course before, it won’t take long to figure out that the inclination is to stop and establish a good shooting platform before shooting. The purpose of this drill is to learn to continually move to a good shooting platform by keeping the feet low to the ground, bending the knees, and walking heel to toe.
Walking backwards is tricky. If the shooter has to face the target throughout the movement, at some point they have to walk backwards. The movement goes toe to heel, and it is almost a shuffle. If a person can shoot without stopping, they will always be able to establish a shooting platform, regardless of the tactical situation.
If your agency is not including movement in training, consider these inexpensive drills. They don’t burn a lot of ammo, and an officer can find out a lot about himself by just moving and shooting.
This article appeared in the July/August issue of OFFICER Magazine.
About the Author

Officer Lindsey Bertomen (ret.), Contributing Editor
Lindsey Bertomen is a retired police officer and retired military small arms trainer. He teaches criminal justice at Hartnell College in Salinas, California, where serves as a POST administrator and firearms instructor. He also teaches civilian firearms classes, enjoys fly fishing, martial arts, and mountain biking. His articles have appeared in print and online for over two decades.