Drills Made Easy

I set out to cover three drills that I use for training. Drills that do not require any expensive equipment, specialized ranges, or additional range safety personnel. Drills that can be performed on a “square” or traditional range and are designed to use only a moderate number of rounds. Using these drills will improve and officers gun handling, precision shooting, efficient presentation, and target discernment.
I did not design or invent any of these drills. Some of them have been used by different academies for years. Several of my friends own firearms instruction schools, and occasionally they let me help with their classes; they use these drills regularly.
I worked with Gene Whisenand of Trident Firearms Academy in California’s Central Valley on describing the mechanics of these drills. The Threat Escalation and Three B’s are used in several of the lesson plans of his Academy. He had seen the One and One drill before but never had used it. I ran him through it a few times. When we did it side-by-side, it turned into a competition. It was a fantastic way to reinforce shooting skills. When we finished with our training session, Gene told me “I think I’ll steal that one.”
The truth is, I never know where the firearms training drills that I use came from, with only a few exceptions. They are passed from one firearms instructor to another, and each of us use them in our respective schools. Some instructors have a unique” twist” on their drills or refine them in a manner that reflects their training goals. When they are used for police training, the specific training objective and training outcomes should be listed in the official record of training.
Of all the things that we like to stress in the training industry, mindset is foremost. That is, we can train perishable skills repetitively all day long, but mindset can only be bolstered by a person’s adherence to perseverance.
The Threat Escalation Drill
Training Objective: Reinforce smooth transition from one use of force method to another.
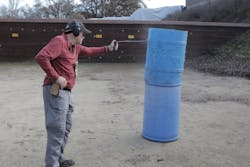

The Threat Escalation Drill starts with the Officer standing in front of a “person”, simulated by either a Century Martial Arts BOB, or two stacked (empty) 55 gallon water barrels. There are two targets behind the BOB. When the officer is told to begin the exercise, he applies OC spray on BOB. When the command of “threat” is called, he disengages from BOB, and fires on the targets.
Disengagement can be done by either shoving BOB over, or creating distance from BOB. An officer is successful in this drill if they successfully disengage from the lower level threat and engage the two targets with A Zone hits. When we do it, we prefer to use a BOB, and shooters shove him completely to the ground. BOB has a heavy base, usually filled with water. It takes a solid shove to rock him in this manner.
We like using inert training spray units like Sabre’s Inert 1.8oz Stream, but save them for testing. This drill does not require more than about 10 rounds per rep, so officers can do it dozens of times during a session before doing a pass/fail session.
The One and One Drill
Training Objective: Reinforce smooth draw, reloading, and accuracy.
My new favorite drill is the One and One drill. I believe it is probably the most valuable range exercise one can do, because of its versatility. Used without any enhancements, the One and One drill enforces emergency reloading (getting the gun back to engaging the threat when it is “slide-locked” from an empty magazine, an efficient draw, and reacquiring a sight picture. These skills are the foundation of the drill. However, most of us shoot this drill with enhancements. What are they? I’ll get to them.
I have been using the One and One drill for quite a while. In fact, I used to use it years ago while training for my dismal entry in IPSC in the 80’s. I never knew it as the One and One drill. In fact, it didn’t have a name. Only recently have I been seeing it pop up on social networking with the name ”One and One.” I didn’t invent the name. I didn’t invent the drill.
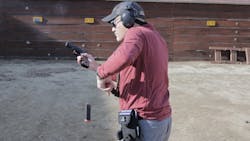
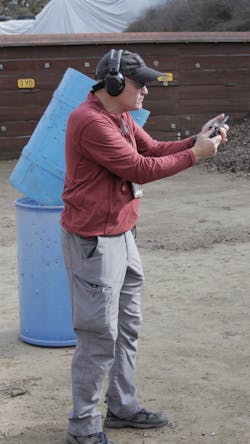
It begins with the officer on the firing line with a holstered handgun and two magazines. One magazine is empty, the other is full. The officer is given the command to draw, insert the loaded magazine into the gun, chamber a round, and holster.
After holstering, the shooter removes the full magazine, placing it in a magazine holder. The gun is loaded with the empty magazine.
Did you notice that I did not mention anything about the targets? This is where this drill shines. You see, one can use it to shoot steel, paper, or anything. It is a great drill to use when training for accuracy as well as speed. During the same session, shooters can shoot it at five yards, then step back and practice at 15.
Use the One and One drill to execute a smooth, consistent draw. If one does this drill with a training partner, each can be a shooter/coach for the other. When I was working with this drill recently, my shooting partner noticed a slight dip in the muzzle at the moment it cleared the holster. Actually, this bad habit has plagued me most of my career. The One and One drill allows plenty of draw repetition and reinforces gun handling. (It looks like I am going to use this drill to extinguish my habit.)
One of the reasons that the One and One drill is so valuable is the fact that you can get 25 reps out of a single box of ammo. This can also be reinforced by doing it sans ammo, as a dry fire drill. Without ammo, it reinforces smooth presentation, magazine exchange, and sight picture. Yes, there are thousands of us who stand—instead of sit—in front of their televisions and shoot the bad guys as they appear on the screen. (My favorite training films are the Die Hard series. Gruber and associates have received hundreds of sinus cavity shots.)
The Three B’s Drill
Training Objective: Reinforce a shooter’s awareness of Safety Rule #4: Be aware of your target and what is behind it.
The Three B’s Drill, or the Backstop, Between, and Beyond Drill uses four to six paper targets arranged in an “instructors choice” pattern (or lack of pattern). The targets are deliberately offset, and often overlapped. Use a variety of “no shoot” targets in this drill.
Parallel to the line of fire (the line where targets are traditionally placed on a range), two cones (barrels, chairs, etc.) are placed about five feet apart, five yards from the nearest target.
Shooters begin with a holstered gun and full magazines. They start the drill by walking slowly in a figure eight pattern around the cones. On the “threat” command, the shooter fires on the nearest target. The targets are offset on this drill for a reason. Shooters engage in the nearest target, but if there is an offset target directly behind him, there is a potential that the bullet could strike that target also. Shooters train to look for where their bullet is going, and whom it will affect.
The Three B’s drill is a lot like musical chairs. When it is time to engage the threat, the shooter has to quickly calculate situational awareness before pulling the trigger. We are not trying to make shooters hesitant. We are trying to make them efficient. At some positions in the “figure eight dance,” it is often better to reposition, reorient, or take cover than it is to initially fire the shot. In other cases, the only presentation might be headshot, as opposed to a torso. In some instances, the shooter might have to resort to a pelvic girdle shot.
If an agency uses this drill, they can document that a percentage of “no shoot” targets were used, and officers were trained to distinguish between threats and non-threats.
This drill should allow the instructor to be quite flexible. For example, sometimes it is best use stacked girls and encourage shooters to shoot from cover. In other versions, the targets are placed in layers about one to two feet apart. The layers are labeled A, B, C, and shooters have to engage targets within those layers. Thus, the command of “B 2” means that the shooter has to engage the second layer, second target in.
Bonus: The 50 Foot Headshot
Training Objective: Reinforce good shooting techniques, including a steady platform, smooth draw, sight picture, and site alignment.
The 50 Foot Headshot drill is actually one of the standards I use for carrying an off-duty or backup firearm. It is the answer to the question, “Can I make a 50 foot headshot with this?” If a person cannot answer “yes,” they should probably be carrying a different handgun. After all, every officer should carry their handgun, even in church.
It goes like this: Standing 50 feet from a target, the officer must draw and fire their handgun from concealment and place their first shot within a four inch circle. This drill should be repeated until the officer can consistently deliver a successful one shot stop five out of five times. (I know I said three drills, but this is something that came up in the news as I was writing. I said I did not design or invent any of these drills, but I’ll take credit for this one.)
Staying safe
It is impossible to predict every type of situation that an officer will encounter. We can, however, train for many situations and prepare our overall skills so that our shooting and gun handling is full of smooth transitions and skills.
Shooting drills are cheap and easy to set up. I recommend that agencies do them on a regular basis. Since these drills are skill builders that anyone can do, I recommend that officers take their training into their own hands and use them often.
About the Author

Officer Lindsey Bertomen (ret.), Contributing Editor
Lindsey Bertomen is a retired police officer and retired military small arms trainer. He teaches criminal justice at Hartnell College in Salinas, California, where serves as a POST administrator and firearms instructor. He also teaches civilian firearms classes, enjoys fly fishing, martial arts, and mountain biking. His articles have appeared in print and online for over two decades.