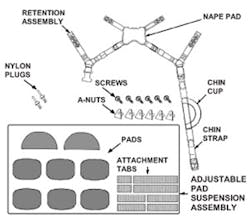
Gentex Helmet Suspension System
I know and appreciate the value of Kevlar helmets. That said, the military suspension system was a sure fire way for me to get a headache when I had to wear the helmet for more than an hour or two at a time. Putting a cut section of foam padding at the top (affectionately called a "donut") helped, but still, the sweat band and padded net just didn't make it comfortable for me. Enter Gentex and their replacement suspension system. After about five minutes of work and a few minutes of size adjustments, I had replaced the old suspension system in my helmet and now have a comfortable to wear Kevlar.
I started out with a standard issue Kevlar helmet (PASGT) - such as the military has had for decades now. I remember being issued such in the early '80s when I was on active duty. The suspension system in them is horrid though. To switch this over to the Gentex system is pretty easy, and the end result is so much more comfortable that there is absolutely no comparison.
The proper complete name for this product is: "PASGT Helmet Adjustable Pad and Four-Point Retention Upgrade Kit".
The Gentex kit comes with all necessary hardware and parts to complete installation. This includes:
- Retention assembly (the strap part)
- Six screws
- Six A-nuts
- Two nylon plugs (kinda like rivets but we'll get to that)
- Eight specifically sized strips of Velcro
- Six oval pads
- Two half-moon pads
Obviously, before installing the Gentex kit you have to remove all the old hardware and chin strap. The holes left by the chin strap won't be used by the Gentex system and the two nylon plugs are provided to fill them. It's simple enough to tap the plugs in using the hammer and when they are in as far as they're going to go you simply cut or break off the remaining material so that they're fairly flush with the helmet surface.
Two of the screws provided, along with two of the A-nuts, are used to fill the front and rear suspension mounting holes. They won't be used and just don't look right if you leave them alone.
Once the old hardware is out, the chin strap holes have been plugged with the nylon plugs and you've got those front and rear screw holes filled, you need to put in the velcro strips. The diagram to the right center shows placement for them. The instructions for the kit tell you in what order to install them. Yes, it does matter. How you place the front, rear and center strips directly affects how you place those that go on angle.
Once the velcro strips are in place you need to mount the suspension strap. At each end of the straps are three holes allowing you to adjust your installation for longer or shorter heads. As weird (or funny) as that may sound, with comfort as your end goal it's important to make sure the straps are installed as close as possible to where you want them. Sure, the straps are adjustable for length after they're installed, but maximize your comfort and versatility by installing the straps to your greatest advantage up front. Use the other four screws and A-nuts to put in the suspension straps.
Proper placement of the pads, per Gentex, is shown in the diagram to the right. However, placement doesn't have to be exactly as shown. The half-moon shaped pads do need to go in the crown / center. The six oval shaped pads are placed with three to the front and three in the back. Space them so that they fit your head with maximum comfort and stability, taking into consideration that the velcro strips need to hold them in place.
Each pad is actually like a felt pouch that contains three seperate foam layers (as shown bottom right). If you need more room inside your helmet then you can take out one or two of the foam layers to customize the fit to your particular noggin.
When you're done, if you've done everything right, the helmet will fit your head snuggly without feeling too tight. If it does feel tight, adjust the pads / foam layers. With a comfortable and stable fit you should be able to wear the helmet for extended periods of time without getting a headache. A few weeks back I wore mine for about ten hours with no issues. Additionally, because of the customized and snug fit of the helmet, I didn't have to worry about it jiggling around on my head as I ran, did PT, etc.
This is, in my opinion, a truly worthy investment. Check out Gentex online for more information about the company and their products.
Stay safe!
