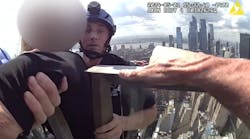
Can you deliver a point-blank shot at an attacking target without shooting any of your own body parts in the process? If I am being completely honest here, I didn’t feel I knew enough about the topic myself. The photos accompanying these articles make me look pretty good, but I had to get some training to get there.
Fortunately, I am smart enough to surround myself with people who do know about these things, and I’m smart enough to ask questions. After “studying up” on the topic, I called my friend Gene Whisenand and he ran me through the techniques that Trident Firearms Academy uses for close quarters defense.
Over the course of five years, 2015-2019, nearly half of the officers killed in the line of duty engaged from less than two yards. If we were to extend that to three yards, the number goes to a little shy of 70%. We have known this rule for years, even when I was living in a patrol car. The fight is up close, and it is measured in milliseconds.
Take that motivation, and consider this: Within the distances I mentioned above, people miss. Reading some of the actual incidents, I found that some of them are actually disengagements. That is, the officer had already been in physical contact with the suspect, and now, disengaged, it went to guns.
Any time I have practiced for an on-duty gun grab, the goal is to keep the gun away from the suspect, shooting side hip and leg back. Generally, we accomplish this by stepping back with the gun side leg. This makes sense: I want to get away from the threat. I want to keep my gun out of reach of the attacker.
Scrutiny of one’s peers is very powerful. We can only speculate, but motivation to train against “gun grabs” ranges from “I do not want any harm to come to me today” to “I don’t want to be shot with my own gun.” If you were to ask me, motivation from the latter is more powerful.
Stepping back from contact distance may give an advantage to the attacker, because distance equals time. In this case, we are giving up drawing or engaging time that we don’t really have. We are already inside of “bad breath” distance, so the most survivable option is to engage. The quickest response wins.Whenever an officer enters any fight, they always have to start in second place. There are only two ways to overcome second place in a gunfight: Extreme luck or extremely consistent training. A couple of training sessions per year is not the answer. If I were to write the training plan for every officer, it would include a minimum of 200 rounds of focused trigger time, five hours of threat recognition/force decision making and 4-40 hours of Jiu-Jitsu per week. My choice in Jiu-Jitsu is small circle, but I have great respect for the Gracie BJJ schools. By the way, some studies suggest that Jiu-Jitsu-trained officers have fewer use of force complaints (Anyaso, 2020). Did Lindsey just say 40 hours?
When we teach responding to an armed threat in CCW classes, we teach students to respond with a “submissive” looking response: hands up, palms out, head slightly down in a partial crouch. For an on-duty officer, this is the “interview” position: hands in front of face, slightly bent knees, bladed upper body. From there, the non-firing hand goes to the head, the firing hand to the gun.
Addressing force decision-making here will definitely go beyond the scope of this article, but the part we do know is the fact that the criminal will always have the tactical advantage. That is, the officer’s legal activity will always be reactive. It is important that all other aspects are proactive. That is, officers must train, maintain a fitness level, use the best equipment and practice a lifestyle that encourages emotional stability. For the purposes of the technique describe here, the officer has already been forced to deliver a lethal response.
Like all training, this skill has to be practiced until the officer can automatically deliver rounds on target.
When we teach CCW topics, we acknowledge that it is hard to prevent people from penetrating our personal space. We have a social zone, where we allow even strangers, and an intimate zone, where we allow people we know. Law enforcement officers are trained to conduct business at a modified social zone. A person can cover the distance between a person’s social zone, from 4-12’, to the close quarters 1.5-4’, inside of a second.
Given the milliseconds an officer has to react to a threat, and the fact that the response can only be reactive, officers are limited in which factors that they can change. These are things we can improve: Recognizing pre-assault indicators, mental preparation and preparing an effective response. Learning to instinctually draw and fire in a defensive posture will reduce the effective response time.
The draw
Most of us train to orient the muzzle toward the target immediately after it clears the holster. In a standard draw sequence, the gun then moves toward up and forward, toward the center of the body and into the sighting plane. While the shooting hand is moving the gun out and up, the non-firing hand meets it during this movement, completing the two-handed grip.
With a suspect at contact distance, moving the gun to the centerline and away from the body makes it easier for an assailant to disarm the officer. The close quarters draw keeps the gun against the body in a protected position.
The close quarters draw sequence begins with the officer achieving a master grip and unlocking all safety devices on the holster. The officer draws, as before, including pointing the muzzle towards the target as soon as it clears the holster. Rather than punching the gun out, it goes straight up to chest level, so the butt of the gun is on the side of the body, contacting the area of the pectoral on the shooting side. The gun takes on a natural cant, making the top of the gun further from the chest than the bottom of the gun. This natural cant also prevents the retracting slide from banging against the body.
I found that it was easier for me to accomplish this movement when I tried to get the gun as high as I could toward my armpit.
The non-firing hand goes to the top of the head. This doesn’t just keep it out of the way-making it more difficult to shoot one’s own body parts. It also protects the face and gives the officer a hard exterior near the head.
With the gun in contact with the body, the rounds are “aimed” by orienting the trunk with the target, in the same manner as a tank being attached to its turret. I found that, as long as the heel of the gun stays on my body, I could put bullets on target accurately. Even moving in an arc around the target, I could center mass the target every time.
For those who have law enforcement experience before the 1990s era, the draw is not much different in concept from the old “speed rock,” a quick draw where the officer drew and flung his shoulders back and shot from the hip, except this technique is designed for a stable and mobile base.
Movement
In order for this to work, officers must orient themselves toward the threat. The purpose of this draw technique is to get away. Therefore, the officer must attempt to create distance. The most logical retreat is straight back. If the range has the correct type of backstop and dimensions, add moving in an arc, where the aggressor is the vertex. I am fortunate to be able to train at Safety First Shooting Association’s River Oaks Firearms Training Center, which has open training bays for this purpose. We are grant funded, and open our facilities to law enforcement training. Our range design allows for this kind of movement.
Gene Whisenand emphasized the importance of dragging one’s feet when retreating, or taking small steps. Tripping over backwards would be disastrous in an armed encounter, and even worse if the decision to fire was not made, and the startle response took over.
Backwards movement must be practiced, and this is another skill that needs to be done with a training tool before live fire. As the officer retreats, the gun can be extended. There is a point when the gun should be raised fully to the sighting plane. The fluid transition to sighted fire can only be trained with actual trigger time.
Things you should know
I am particular about mental alertness when training. I found this training to be exhausting, even if the sessions were only a couple of hours. If you are a law enforcement trainer, use frequent breaks, and rehearse without live fire after these breaks.
The first time you try this, hopefully after a full session of no live fire, you will realize that muzzle blast is inherently dangerous. Use eye protection that covers the eye well.
At close quarters distance, my first inclination is to jam the draw, deliver an empty hand strike, or something similar. Let me encourage this behavior. Depending on the situation, your PDWs (personal defense weapons) are often the best choice. Your best agency asset is to have the defensive tactics instructors sit down with the firearms training staff and plan this training.